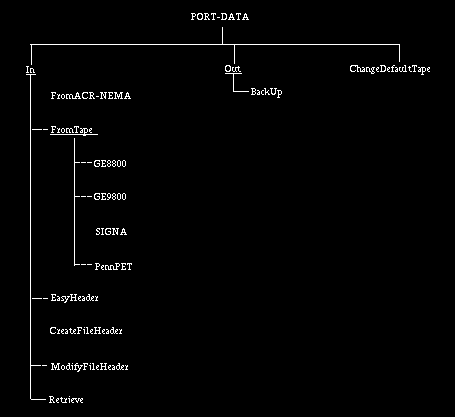
Fig 8.1: Commands under PORT-DATA.
Fig 8.1: Commands under PORT-DATA.
The main purpose of PORT-DATA commands is to make it possible to bring into 3DVIEWNIX image data generated by external sources such as imaging devices, to make back up of files generated by 3DVIEWNIX, and to retrieve them. Commands under In allow bringing data into 3DVIEWNIX and those under Out allow taking data out.
Conversion of image data formats is a painful issue for several reasons. Vendors of imaging equipment have their own proprietary formats. Often the same vendor has different formats not only for different modalities but also for different models in the same modality. Host computers of the imaging devices may differ in their conventions of byte ordering used for basic data entities such as for short and long words. Additionally, the medium on which data are written can pose medium- and host-computer-specific data transfer issues. Clearly, the possible number of combinations of these variables is quite large, and for the development of a data- and machine-independent system such as 3DVIEWNIX, handling data becomes a major task. Finally, for an open system such as 3DVIEWNIX, another issue to be faced is the non-disclosure of vendor image data formats. This is against the principle of 3DVIEWNIX of keeping all information accessible via documents and source code.
For these reasons, early in the design phase of 3DVIEWNIX, we decided to adopt ACR-NEMA Standards for image data representation, promulgated by the American College of Radiology and National Electric Manufacturer's Association. 3DVIEWNIX accepts data in the ACR-NEMA format from imaging devices. This seems to be the most elegant solution to the vexing data transfer problems mentioned above. We, therefore, strongly encourage 3DVIEWNIX users to urge their imaging equipment vendors to provide a standard ACR-NEMA output of image data generated by their devices.
Unfortunately, ACR-NEMA 2.0 standards do not handle three- and higher-dimensional image data as a single message. Recognizing the need for a multidimensional generalization of ACR-NEMA 2.0 standards, we put in a major effort in designing, implementing, using, and refining a data protocol to handle all (image and structure) data generated within 3DVIEWNIX in the multidimensional setting. A companion manual entitled "Data Format Specification: A Generalization of the ACR-NEMA Standards to Multidimensional Data," gives complete details of this generalized format with examples.
We have included commands under PORT-DATA to make it as convenient as
possible to transfer data without giving up openness. Commands
EasyHeader, CreateFileHeader and ModifyFileHeader allow you to
interactively convert almost any image data files into the
multidimensional generalized ACR-NEMA format of 3DVIEWNIX, provided the
input image data are stored as a rectangular array. If your application
requires routine processing of a large number of multidimensional data
sets, interactive conversion may be time-consuming and bothersome. Or
your data sets may be in a complicated encoded format. In such cases,
you may wish to develop a program that automatically converts input data
into the multidimensional format of 3DVIEWNIX. To help you develop such
programs, we have included an example program in Appendix A and
descriptions of appropriate 3DVIEWNIX library functions that are needed.
8.1 In
8.1.1 Summary of Commands
These commands, allow bringing data into 3DVIEWNIX. Data may come from
external sources or may have been previously generated by 3DVIEWNIX.
FromACR-NEMA allows transcribing image data in the standard ACR-NEMA 2.0
form into 3DVIEWNIX format. FromTape allows converting image data from
vendors into 3DVIEWNIX format. EasyHeader allows converting
interactively a data set quickly into 3DVIEWNIX format. It asks the user
for only some essential information about the data. CreateFileHeader
also allows converting the input data interactively into 3DVIEWNIX
format but requests for more elaborate information about the input data.
ModifyFileHeader is for modifying any information, such as number of
slices, pertaining to the input data which are already in the 3DVIEWNIX
format. The purpose of Retrieve is to load into the system data
previously generated by 3DVIEWNIX and dumped on a particular medium such
as a magnetic tape.
8.1.2 Commands
8.1.2.1 FromACR-NEMA
The purpose of this command is to convert data that already exist as
ACR-NEMA messages on disk into a file containing a (3D or 4D) scene in
the 3DVIEWNIX generalized ACR-NEMA format. Each ACR-NEMA message
contains one slice image in a separate file. A word of caution is
essential here. We have come across data in the so-called ACR-NEMA form
from vendors that do not adhere strictly to the ACR-NEMA 2.0
specifications. FromACR-NEMA assumes strict adherence to ACR-NEMA 2.0,
although it tolerates certain non-serious deviations from the standard
specifications. If FromACR-NEMA fails to transcribe a data set which is
supposedly in the ACR-NEMA 2.0 format, we suspect this failure is mainly
due to a serious violation of the standards in the input data. Unless
you are certain that the input files are strict ACR-NEMA (2.0) messages,
we recommend that you put the resulting output file through (as an
input) one of the header conversion commands, such as EasyHeader, and
verify the header contents for salient information. In a routine
processing set up, you need to do this only once at the beginning.
Often, even when the format conforms to the standard, certain message
elements, such as slice location, do not have defined values. This is
not a violation of the standards since such elements are not required
for describing a 2D slice as an independent message. However, they
become vital in treating a set of slices as a single 3D or a 4D scene.
Some of the commands under SceneOperations may not work if such elements
are not defined. This is one of the main reasons why we decided to
generalize ACR-NEMA 2.0 to accommodate multidimensional scene and
structure data.
The panel options available in this command are shown in Figure 8.2 upon selection of this command, the mouse button states become:

A tablet called SOURCE is set up in the dialog window at this time. The name of the proper directory that contains the ACR-NEMA messages should be entered in this tablet (see Section 4.6 for the operation of tablets).

Fig 8.2: Panel Options for FromACR-NEMA.
ARCH: This is a switch, which stands for "architecture". Its states are I, II, . . . . , VIII. Each state corresponds to a particular combination of the ordering of the bytes in 16-bit and 32-bit words. The combinations for the eight architectures considered are listed in Figure 8.3. Here byte1, byte2, . . . are in the increasing order of significance. INPUT column lists byte order in the input file and OUTPUT lists the order in the output file.
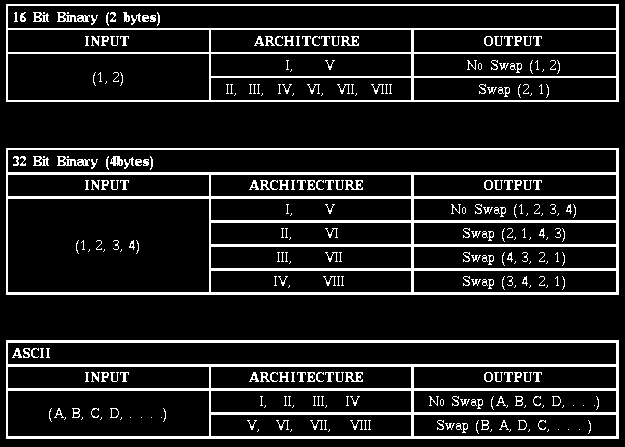
Fig 8.3: Byte ordering in the 16-bit and 32-bit words for the eight
architectures associated with the switch ARCH.
ACR-NEMA 2.0 specifies a specific order (of bytes) in which messages are to be transmitted. Unfortunately, the computers that receive these messages often do not retain the messages in that order but store them in the order of bytes that is natural to the machine. We identify these variations with eight architectures. 3DVIEWNIX users are likely to be uncertain about the architecture of the receiver of the ACR-NEMA messages. Determination of the correct architecture is done via the button BROWSE.
BROWSE: This is a button which when selected either displays a table (in the image window) of the form shown in Figure 8.4 or gives a message "No message in the directory." If the architecture chosen via ARCH matches the architecture for the message, the table is displayed as in Figure 8.4. The determination of correct match is made by being able to recognize the ACR-NEMA recognition code correctly in the message. This recognition can occur for only one architecture. If the recognition fails or there is no ACR-NEMA message in the chosen directory, then the message "No messages in the directory" is displayed. If you are not sure about the architecture, try out each architecture and select BROWSE. Once the correct architecture is identified, it is likely not to change at your installation.
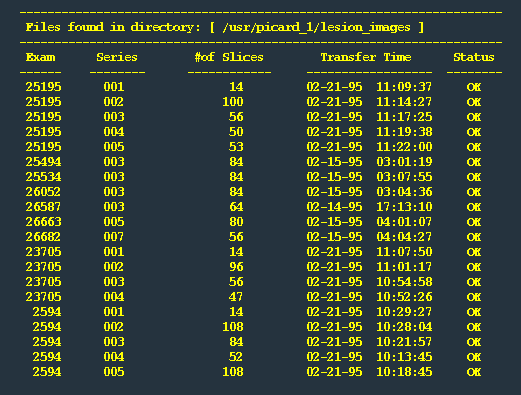
Fig 8.4: Format of the table displayed when BROWSE is selected.
To proceed with the transcription of data, you should know the Exam number associated with the data. Simply select the row listing this number (in the table displayed in the image window) by clicking the left mouse button when the cursor is pointing to the row. To unselect it, click the left button again. The column entitled "# of slices" lists the total number of slices comprising this data set for a 3D scene. For a 4D scene, you may have to select several rows corresponding to several "Series" numbers with the same Exam number. You should therefore know the Exam and Series numbers of all data that comprise a single 3D or 4D scene. It is also important that the names of the files that contain the ACR-NEMA messages follow the ACR-NEMA file naming convention. The file containing the first image of series 3, study 1234, performed on scanner HUP, is expected to have the name HUP.01234.003.001. If the file names are not in this form, you can convert the existing names to standard names via a program called general2pacs which can be found in the PROCESS/BIN directory of 3DVIEWNIX. This program will ask for a "wild card" (a string of characters that may be common to all file names of interest) and an architecture (along the same convention as the ARCH panel switch (see Figures 8.2 and 8.3)). Once the conversion is done, you can proceed to FromACR-NEMA.
Once the proper messages are selected from the table, to initiate the
actual transcription, select SAVE in the OUTPUT section of the mouse
window. You may wish to change the name of the output file that is to
contain the resulting scene data from the default name listed in the
tablet in the OUTPUT Section.
#endtopic#
8.1.2.2 EasyHeader
The purpose of this command is to convert any input file containing a
scene or a binary scene, which is stored as a rectangular matrix in a
row-by-row, slice-by-slice, volume-by-volume form into an IM0 or a BIM
file in the generalized ACR-NEMA format of 3DVIEWNIX. This implies that
the header of a file that is already in the 3DVIEWNIX form can also be
modified by using this command. This command looks at only the most
important header entities relating to the data. If a more comprehensive
header description is desired, you should use CreateFileHeader. Note
that EasyHeader assumes that the input data are stored in a rectangular
matrix form. But it allows transferring even a subset of the input
slices to the output.
Upon selection, this command sets up several tablets in the image window each corresponding to a particular data description entity. It also sets up tablets in the dialog window that specify the nature of the output operation. The tablets labelled INPUT FILE and OUTPUT FILE in this window are for specifying the name of the input and output files. SKIP is for indicating the number of slices in the input file that are to be skipped before commencing transfer of data to the output. SLICES specifies the total number of slices that are to be transferred. INCR specifies how far is the next slice to be transferred from the current slice. INCR = 1 means the next slice to be output is the very next slice in the input file. SKIP, SLICES, and INCR together allow selecting a subset of the input slices at any desired uniform sampling rate. The tablet named HDR LENGTH appears only when the input file does not conform to the 3DVIEWNIX format. It specifies the total number of bytes required to store the header part of the input file. You need to know and specify precisely this number in order for the data transcription to be successful. To change any text/values in any tablet, place the cursor within the tablet, click left mouse button, type in text/values using the keyboard, and finally press the Return key.
The panel options available under this command are shown in Figure 8.5 and are described below.
 (a)
(a)
 (b)
(b)
Fig 8.5: Panel Options for EasyHeader: (a) when the input data have a
header different from that of 3DVIEWNIX, (b) when the input data have a
3DVIEWNIX header.
HDR: This is a switch with two states, OTHER and VIEWNIX. If the input file is known to be already in the 3DVIEWNIX format, you should select the state VIEWNIX. Otherwise the state OTHER should be chosen.
SAVE NEWHDR: This is a button which when selected saves the header information that is created in the image window in the output file. This option should be selected after all data description items have been filled in the image window. This option should be selected always prior to the SAVE DATA option.
SAVE DATA: This option is implemented as a button. Its purpose is to transfer image data from the input file, starting from a location determined by the values entered in the tablets SKIP and HDR LENGTH, to the output file. This option should be selected always after the SAVE NEWHDR option.
READ HDR: This option is a button which when selected reads the input file header and displays the values in the appropriate tablets in the image window. The input file is assumed to be in the 3DVIEWNIX format.
CPY INPUTHDR: This option, also realized as a button, allows copying the entire input file header directly to the output file. It is useful in situations that require repeated conversions of identical nature. The header from an output file already created can be copied to the output file that is currently being created and data from the desired input file can be subsequently transferred to the output file.
SAVE MODHDR: The purpose of this button is to allow replacing the values in the appropriate sections in the input 3DVIEWNIX file header by the values currently defined in the image window and writing this header to the output file. The input file is not modified. This option should be selected always prior to the SAVE DATA option.
This command can be terminated by clicking the right mouse button.
8.1.2.3 CreateFileHeader
The purpose of this command is to convert any input file containing a
scene or a binary scene stored as a rectangular matrix (row-by-row,
slice-by-slice, volume-by-volume, . . . .) into an IM0 or a BIM file. It
allows a more comprehensive header description than EasyHeader. Just as
EasyHeader, it allows transferring to the output a subset of the set of
slices in the input file.
Upon selection, this command sets up several tablets in the dialog window. These and their functions are identical to those in EasyHeader. The tablets labelled INPUT FILE and OUTPUT FILE are for specifying the name of input and output files. SKIP is for indicating the number of slices in the input file that are to be skipped before commencing transfer of data to the output. SLICES specifies the total number of slices that are to be transferred. INCR specifies how far is the next slice to be transferred from the current slice. INCR = 1 means that the next slice to be output is the very next slice in the input file. SKIP, SLICES, and INCR together allow selecting a subset of the input slices at any desired uniform sampling rate. HDRLNGTH specifies the total number of bytes required to store the header part of the input file. You need to know and specify precisely this number in order for the data transcription to be successful. To change any text/values in any tablet, place the cursor within the tablet, click the left mouse button, type in text/values using the keyboard, and finally press the Return key.
The panel options available under this command are shown in Figure 8.6.

Fig 8.6: Panel Options for CreateFileHeader.
EDIT HDR: This button when selected displays a window containing a list of descriptions of the header elements pertinent to scene data in the image window. The list can be scrolled up and down by keeping the cursor within the two vertical lines on the left margin of this window and by clicking the middle or the left button, respectively. To set (or modify) a value for a particular element, place the cursor anywhere on the row corresponding to the element, click the left mouse button, type in the value (or modify the value) and then press the Return key. If the element has further sub-elements associated with it (for example, the element "unit of measurement" has three sub-elements, one for each of three dimensions if the scene data dimensionality is 3), a subwindow is displayed containing a list of the sub-elements. After the values associated with the sub-elements are entered/modified, to exit from the subwindow, click the right mouse button when the cursor is within the subwindow. A similar operation when the cursor is in the main window terminates this option.
SAVE HDR: This button should be selected to write the header to the output file once the values of the required elements have been specified. This option should be chosen prior to selecting the SAVE DATA option.
SAVE DATA: This button should be selected to actually transfer slice data from the input file specified by the tablets SKIP, SLICES, and INCR to the output file.
It is advisable to change/specify values associated with the elements in
the order in which they are listed. Otherwise the specification may lead
to wrong descriptions. For example, if the dimensionality of the scene
is not defined, the unit of measurement in each dimension becomes
difficult to specify.
8.1.2.4 ModifyFileHeader
This command is to be used for modifying the header entries of files
that are already in the 3DVIEWNIX format. While EasyHeader can also be
used for this purpose for IM0 and BIM files, ModifyFileHeader allows a
more comprehensive header description and modifying IM0, BIM, MV0, SH0,
BS0 and BS1 files.
When the command is selected, files of the above type are listed for selection in a fashion identical to that in the Input command. However, here you are allowed to select only one file. When a new file is selected, any previous selection is automatically deselected.
When file selection is completed, this command displays a window, as in the EDIT HDR option of CreateFileHeader, listing descriptions of the header elements pertinent to the type of the data contained in the input file. The list can be scrolled up and down by placing the cursor within the two vertical lines on the left margin of the window and by clicking the middle or the left button, respectively. To set (or modify) a value for a particular element, place the cursor anywhere on the row corresponding to the element, click the left mouse button, type in value (or modify value), and then press the Return key. If the element has further sub-elements (for example, "unit of measurement" has three sub-elements, one for each of the three dimensions if the input is an IM0 file containing a 3D scene), a subwindow is displayed listing the sub-elements. After the values associated with the sub-elements are entered/modified, to exit from the subwindow, click the right mouse button when the cursor is within the subwindow. A similar operation when the cursor is in the main window terminates this command.
To output the modified file, you should first change the output file
name in the output section in the mouse window to a desired name and
then select SAVE.
8.1.2.5 Retrieve
This command lets you extract a (tar) file that was previously dumped to
a medium via the command BackUp to the current directory. You can select
the tape (host, device, the mt option and block size) from a default
list using the panel switch DEV. You can also specify a new tape using
the tablets in the dialog window. (Refer to the end of Chapter 2 for a
detailed description of the tablet values.) Note that if you are
specifying a new tape, make sure that the device you give does not
rewind the tape after each operation.
REWIND button lets you rewind to the beginning of the tape.
SKIP lets you specify the number of tar files to skip from the current tape position before retrieving the relevant tar file. The default value for SKIP is 0.
RETRIEVE extracts the specified tar file contents to the current directory.
Note: The block size specified should match the values used while
backing up the files (see below). The default value is the same for
Backup and Retrieve operations.
8.2 Out
The only command under Out at present is Backup.
8.2.1 BackUp
This is very similar to the Retrieve command with two exceptions. The
RETRIEVE button is replaced by BACKUP and an additional tablet FILE(S)
is introduced in the dialog window.
FILE(S) tablet allows you to specify a list of files (each separated by a space) to be backed up. Any of these files could contain wild card characters that Unix permits. Leaving this tablet blank results in the whole directory being backed up.
BACKUP actually generates a tar file and writes it out to the specified tape.
Note: Different devices have different requirements in terms of block size, so to make best use of your tape, consult your system administrator for a suitable value.
The COM files are never dumped unless they are specified individually or
with a wild card. If you do not specify anything in the FILE(s) tablet,
all files except the COM files are dumped. To dump COM files, you should
specify them explicitly in the tablet.
8.3 ChangeDefaultTape
This command allows you to change the default tape used by the commands
PORT-DATA-In-FromTape, PORT-DATA-In-Retrieve and PORT-DATA-Out-Backup.
The default list of tapes that are specified either in the current
directory or in the 3DVIEWNIX system's FILES directory is displayed in
the image window. The current selection that is used by the above
commands is listed in tablets in the dialog window. A new selection can
be made by either selecting the corresponding line from the list
displayed or by editing the tablets. (Refer to the end of Chapter 2 for
a detailed description of the tablet values.) Note that if you are
specifying a new tape, make sure that the device you give does not
rewind the tape after each operation. To make the selection permanent,
press SAVE SEL button.
 User Manual
 Library Ref. Manual
 Tutorial