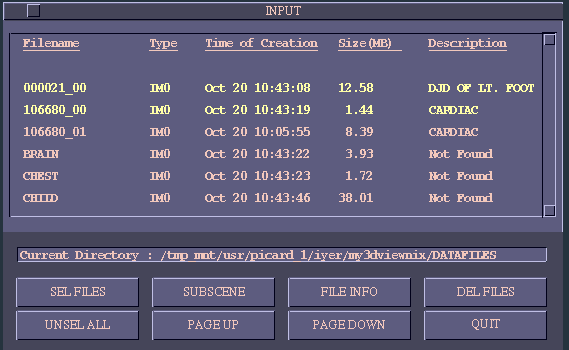
Fig 7.1: Illustration of Input Command.
This command when executed lists information pertinent to certain data files that are in the current user directory. The types of files to be listed are determined automatically depending on the operation done by those commands for which Input is being executed for selecting files. For example, for Input under SceneOperations (see Figure 6.1), only IM0 files are listed since commands under SceneOperations operate only on scene data. If the most recent selection of files is appropriate for operation by other commands than for which the files were selected, then it is not necessary to select the files again. Suppose you selected two IM0 files under SceneOperations to run Classify-2Features. If you wish to visualize the scene data contained in these files using Visualize-Slice-Montage, there is no need to select Input again under Slice.
When Input is selected, it creates a window within the image window and displays a list of names of pertinent files together with a set of buttons at the bottom of this window to facilitate convenient selection of files, as illustrated in Figure 7.1. To scroll the displayed list down or up, place the cursor in the square, respectively, at the top-right and bottom-right part of this window (see Figure 7.1) and click the left button.
Fig 7.1: Illustration of Input Command.
A file to be selected is indicated by placing the cursor anywhere in the line that contains the desired file and clicking the left button. The indicated file is highlighted. To unselect, simply place the cursor on the selected line and click the left button again. Eventually, upon indicating a set of files in this manner, the files are actually selected by pressing the SELECT FILES button.
The option SUBSCENE allows specifying a subscene if the indicated file is of IM0 type. When this button is pressed, another window is displayed by the side of the Input window and information related to the size of the scene domain is displayed. For a 4D scene with domain 256256108, this information consists of the number of the first slice in each 3D subscene (1) (called first index in dimension 3), the number of the last slice in each 3D subscene (10) (called last index in dimension 3), slice increment (1) (called increment in dimension 3), the number of the first 3D subscene (1) called first index in dimension 4), the number of the last 3D subscene (8) (called last index in dimension 4), and increment in dimension 4 (1). These numbers can be modified by the user to define a 4D subscene. Continuing with the example, by changing the above six numbers to 2, 10, 3 and 3, 8, 3 we effectively specify a 4D subscene consisting of two 3D subscenes numbered 3 and 6 in the original scene each of which has three slices numbered 2, 5, 8 in the original scene. The user should press SET SCENE in order to actually define the subscene. If multiple IM0 files are selected, a subscene can be defined for each file. Some commands in 3DVIEWNIX, such as VISUALIZE-Slice, actually load only the subscene defined this way and process the subscene.
The INFO bottom, when pressed, displays a summary of some of the important descriptors related to scene, structure and display data information contained in the selected files.
The DELETE FILES button can be used to delete unwanted files. The final
deletion is done always upon confirmation with the user.
7.2 Common Options
GREYMAP:
This option is available whenever slices are to be displayed. It is a button which when pressed sets up two scales labelled GREY LEVEL and GREY WIDTH in the dialog window. By choosing map level and map width values on these scales, any desired gray map operation can be done on the slices that are being displayed.
Default settings for map level and map width are (max+min)/2 and (max-min), where max and min are the maximum and minimum cell intensity values for the input scene.
SET INDEX:
This option, implemented as a button, allows quick random (non-sequential) access to any slice within the nD scene. When it is selected, a set of scales are set up in the dialog window. The number of is the number of slice indexes for the scene. For 3D scenes, this number is 1, for 4D it is 2, and so on. Each scale allows selecting an index value for a particular dimension that determines the number of the slice that is to be selected. For a 4D scene of domain 256256108, for example, the first scale, labelled DIMENSION 3, allows selecting a particular slice in a 3D subscene. The second scale, labelled DIMENSION 4, allows selecting the particular 3D subscene. Thus, in order to select the 7th slice in the 5th 3D subscene (in a dynamic scene this corresponds to the 5th time instant), we have to set the first scale to 7 and the second to 5.
PREVIOUS, NEXT:
These options, both available as buttons, allow changing slices or groups of slices displayed to corresponding previous or next entities. Change to previous or next entity takes place with every press of these buttons. This change takes place in a cyclic fashion. This means that if the current entity is the first in the sequence, selecting (pressing) PREVIOUS causes the last entity to be displayed. Similarly, if the current entity is the last in the sequence, selecting NEXT causes the first entity to be displayed. Consider a 4D scene of domain 256256108 as an example. If the indexes of the slice displayed currently are (1, 1) (these correspond to dimension 3 and 4 respectively), precessing PREVIOUS results in a display of the slice with indexes (8, 10). Subsequent presses of PREVIOUS result in slices (8, 9), (8, 8),....,(8, 1), (7, 10), (7, 9), etc. If the current slice is (8, 10), repeated selection of NEXT will result in slices (1, 1), (1, 2),....,(1, 10), (2, 1), (2, 2), etc. .
Sometimes slices are displayed as a montage. PREVIOUS and NEXT in those situations refer to the previous and next "page" or "row" of the montage.
LABELS:
This is a switch with two states ON and OFF. In the ON state, certain descriptors related to the picture such as the data set number, the indexes of the slice or of the picture, and the scale factor for magnification are displayed overlaid on the picture. A scale factor of 1 means 1:1 correspondence between the pixels of the displayed picture and the input picture (from scene or display data) it represents. In the OFF state, the labels are removed and the displays are slightly faster than when the labels are ON. The default state for this switch is ON.
INTERP:
This also is a switch with two states, ON and OFF. When a slice from an input scene or a picture from an input display data set is displayed, it is usually subjected to scaling. The displayed picture is not a one-to-one mapping of the input picture. This means that in computing the displayed picture, interpolation is needed. When INTERP is ON, the displayed picture is smooth (especially around the edges) since interpolation is done in this case based on the intensities of pixels in a small neighborhood. When INTERP is OFF the interpolated intensity is determined based on the intensity of the nearest pixel and hence the picture is somewhat rough. Smooth interpolation is usually more time consuming, therefore, use this switch with care. The default state for this switch is ON.
LOCK/UNLK:
This is a button. Certain commands in 3DVIEWNIX, for example, Visualize-Slice-Cycle-Display, allow displaying simultaneously a number of pictures representing slices of scenes and renditions of structures from the same input file or different files. These pictures can be displayed in a cine mode to animate sweeping through a stack of slices or rotation of a structure or the motion of a dynamic object. This button allows selecting any of the displayed pictures to be locked/unlocked for cine display. When this option is selected the mouse buttons become:

To "lock" a picture, place the cursor on the picture and click the left button. Clicking the middle button causes the picture to be "unlocked". In the cine mode of display, only the pictures that are unlocked change dynamically. This option should be terminated by clicking the right button before other options can be selected.
MOTN:
This is a switch with two states, 1-WAY and 2-WAY. It helps in controlling the order in which pictures are displayed in a cine mode. The pictures may represent slices from a 3D or 4D scene or renditions from an MV0 file or the renditions of a dynamic object that are actually being generated. This switch is a simple mechanism of providing "forward-only" and "to-and-fro" order of displaying the pictures. Consider as an example the cine display of a 3D scene with 10 slices. In the forward order, the slices displayed are 1, 2, 3, . . . . ,10, 1, 2, . . . . , when MOTION is set to 1-WAY. When this switch is in state 2-WAY, the order becomes 1, 2, 3, . . . . ,9, 10, 9, 8, . . . . ,2, 1, 2, . . . .
ERASE:
This option, available as a button, allows deleting resliced slices displayed on the screen. To remove a slice from the display, simply place the cursor on the display of the slice and press the left mouse button. To remove all slices from the display, click the middle mouse button. This option should be terminated by clicking the right button before other commands or options can be selected.
RESOLN:
This is a button which allows specifying the resolution of an output scene or of an output structure in multidimensions. When selected, this option sets up a number of scales on which cell size in various dimensions are specified. For a 4D output scene, for example, three scales are set up labelled CELL SIZE (x1, x2), CELL SIZE (x3), CELL SIZE (x4).
The default values are: pixel size of input scene for the first and second scales, and the cell size in the 4th dimension of input scene for the third scale.
OBJECT, STATUS:
These are both switches. OBJECT is for selecting a particular object in the structure system that is currently considered so that any object-specific options such as those for changing its opacity and color may be applied to it. OBJECT has as many states as the number of distinct objects in the current structure system chosen. We refer the reader back to the example given under the description of Structure System and Parameter Vector in Section 3. In that example, although we had 14 structures, there were only 4 objects. OBJECT refers to heart muscle, blood pool, liver and the isodose surface, which were considered respectively as object #1, 2, 3, and 4. STATUS has two states ON and OFF. If this switch is ON (meaning in state ON), the current structure chosen via OBJECT is included in the rendition of the current structure system. If it is OFF, the structure is not included in the rendition. OBJECT and STATUS together allow any combination of objects to be included in the rendition. If a particular object occludes some interesting aspects of the structure system being viewed, the object can be turned off for unobstructed visualization.
OBJECT is also used independently of STATUS for specifying the number of the object being considered in some instances. In Interactive2D, OBJECT is used in this fashion to indicate the number of the object that is being specified via interactive segmentation. By default, all structures in all input structure systems are turned ON.
COLOR:
This is a button which allows changing the color assigned to the current structure (selected via the switches OBJECT and STATUS) of a selected structure system. Three scales, one for each of Red, Green, and Blue component of color, are set up when this option is selected. As the values of these components are changed, the color of the selected structure in the rendition changes. To see the effect of this change on the object display, its STATUS should be ON.
The default color assigned to all structures is grey.
OPACITY: This option, implemented as a button, allows selecting the opacity of the currently selected object. When multiple objects are to be displayed in a structure system, or when the internal aspects of a structure are to be revealed, this button allows making selected objects semitransparent. When the option is selected, a scale is set up to select the opacity value. When this value is set to 0, the object becomes totally transparent (and hence invisible) and when the value is 100, the object becomes totally opaque. Any desired translucency effect can be obtained by changing the opacity value as well as the value of other optical properties such as diffuse and specular reflection (See DIFFUSE and SPECULAR below).
DIFFUSE, SPECULAR:
These options, available as buttons, can be used to change the reflective properties of the currently selected objects. Three scales are set up when each option is selected, called PERCENTAGE, EXPONENT, and DIVISOR. DIFFUSE allows changing the matteness of the chosen object in the display and SPECULAR allows changing its shininess. Increasing the value of PERCENTAGE increases the manifestation of the corresponding property. When PERCENTAGE is increased for one property, its value for the other property is automatically decreased so that the two sum up to 100%. Increasing the value of EXPONENT for DIFFUSE decreases object matteness whereas increasing EXPONENT for SPECULAR increases object matteness but its increase for SPECULAR reduces object shininess.
Increasing specularity has the effect of enhancing the appearance of subtle features such as ridges, cracks, pits, etc. But it may also increase noisy irregularities in the structure which may have come due to imaging operations. The users should therefore experiment to determine the optimal values of these parameters for their application rather than go with the default settings always.
BACKGROUND:
This option is available as a button. It allows changing the color and brightness of the background in the display of the rendition of a selected structure system via three scales, one for each of Red, Green, and Blue components.
The default setting for this option corresponds to a small grey value. Making it too bright may obliterate viewing of the rendition and making it too dark may not allow viewing of those aspects of the structure system that fade away. The users should experimentally or by experience determine optimal settings for their application.
AMBIENT:
This option is available as a button. It allows changing the color and brightness of the ambient light via three scales called RED, GREEN, and BLUE.
The default settings for this option are 0, 0, 0. The users should experimentally determine optimal settings for their application.
A-ALIAS:
This option, available as a switch, allows creating smooth renditions by setting the switch to ON. In this state, rendering is usually much slower but renditions are visually more pleasing than when the switch is in the OFF state since renditions are created via antialiasing.
The default setting of this switch is OFF. It is advisable to use this state in interactive sessions except when views are to be saved for hard copy or presentation purposes. If the machine running 3DVIEWNIX is capable of providing sufficient speed, then the switch may be set to ON. The users should experimentally determine in conjunction with other options the state to which this switch should be set.
ROTATE OBJ:
This option, available as a button (panel or mouse), allows rotating structures and structure systems about any of the three view space coordinate axes, x, y and z. The mouse button state diagram associated with this option is shown in Figure 7.2. Rotations are always from the current orientation of the objects in the display. The orientation can be set to the initial unrotated position by selecting the RESET OBJECT option (middle button) in state 1. To give effective interaction, an icon constituting a coarse representation of the objects is always displayed which can be rotated interactively on most machines. The full rendition appears when the rotation of the icon stops.
In state 4, the nature of the movement of the mouse depends on the situation. In some instances, the required mouse movement is around the picture representing the rendition. In other cases, when this cannot be done unambiguously, horizontal motion to the right causes clockwise rotation and horizontal motion to the left causes counterclockwise rotation in the plane of the rendition.
The amount of rotation about the current axis is always shown in the dialog window. By noting the sequence of axes chosen for rotation and the amount of rotation about each axis, it is possible to get to precisely the same view if the user so desires. This may be useful in comparing renditions and in publication.
SPEED:
This option, implemented as a button, is for adjusting the sensitivity of mouse motion to an associated action. The value of this sensitivity is chosen on a scale set up when this option is selected. For example, in the ROTATE OBJ option, mouse motion is used to specify the degree of rotation about a specified axis. When the value selected on the SPEED scale is low, the degree of rotation for a given mouse movement is also low. By setting high SPEED value, the rotations can be made to be very sensitive to mouse motion. This option allows the user to conveniently control the sensitivity of the mouse for the action it is being used.
QUIT:
This panel option causes exit from the currently active command.

Fig 7.2: State diagram for ROTATE OBJ. An arrow leaving a button area
indicates that that button has been clicked.
7.3 Common Static Options
Static options are those that are provided in the mouse window. These
are available while most of the 3DVIEWNIX commands are executed.
HELP:
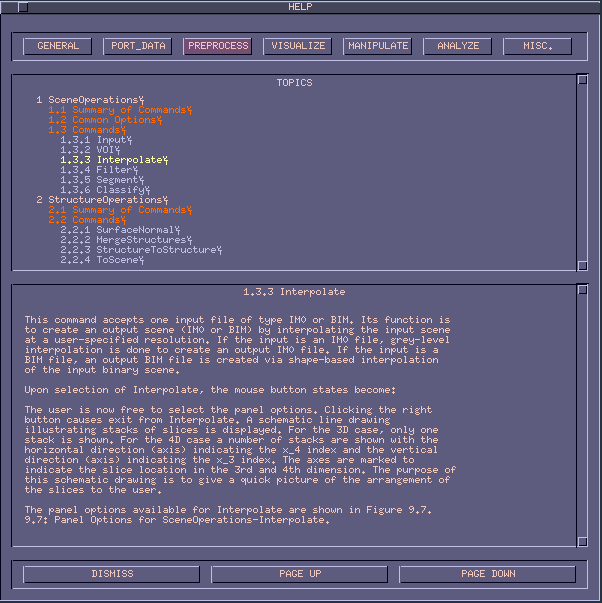
This option provides on-line access to the 3DVIEWNIX User Manual. When the option is selected, a window is created within the image window as indicated below. Buttons are set up at the top of the window corresponding to each of six main subjects: Port-Data, PreProcess, Visualize, Manipulate, Analyze, Misc. The six subjects, second through seventh, deal with chapters of identical name in the User Manual. The first subject covers the remaining chapters. When a particular subject is selected by selecting the corresponding button, the major topics covered under the corresponding chapter are listed in the area captioned TOPICS. You may select any desired topic by pointing to the topic and clicking the left button. If the number of topics is large, you may have to scroll the TOPICS list up. When a topic is selected, the textual description under that topic is displayed in the area captioned HELP. This display can be scrolled up or down in a page mode using the buttons labelled PAGE UP and PAGE DOWN. The button labelled DISMISS should be clicked to terminate the HELP option.
INFORMATION:
The purpose of this option is to display salient information pertaining to the data contained in the current input files. The nature of the information displayed depends on the type of the data.
When this option is selected, a window is created within the image window for displaying the data-related information as shown below. The display is divided into four areas captioned GENERAL INFO, SCENE INFO, STRUCTURE INFO, and DISPLAY INFO. The first area lists important general information relating to the data. The second, third and fourth areas list important information relating to scene, structure and display data, respectively.
The area captioned FILES SELECTED lists all files that are currently selected. 3DVIEWNIX keeps track of names of files selected via the command Input in a file named GLOBAL.COM.
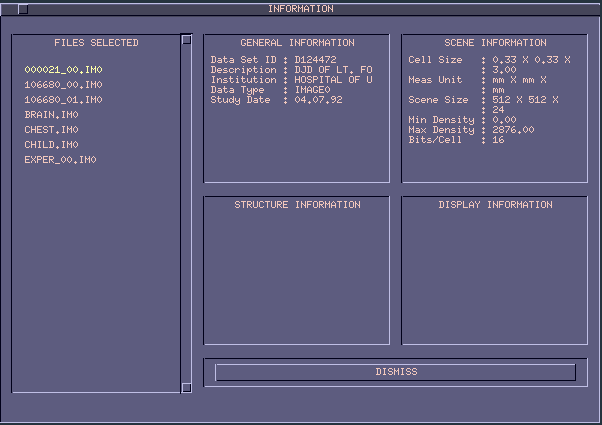
A file name is removed when the file is deselected. If a file is deleted, its name, if present in GLOBAL.COM, is removed. The files that are listed under FILES SELECTED are those whose names are present in GLOBAL.COM.
You may select any of these files by pointing to its name and clicking the left button for examining pertinent information for the data contained in the file. The information will be displayed in the area designated for the particular data type.
You should select the option DISMISS to terminate INFORMATION.
ANNOTATE:
This option, implemented as a button, allows drawing annotating text and graphics on the pictures displayed in the image window. It is useful for creating screen compositions (that can be saved via SVSCRN) for hardcopy, demo and publishing purposes.
When this option is selected, it puts up its own panel options as shown in Figure 7.3.
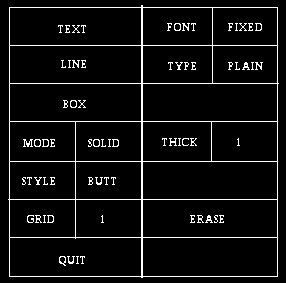
Fig 7.3: Panel Options for ANNOTATE.
The mouse button status now becomes:

The functions of the panel options are described below.
TEXT: This is a button which allows printing text anywhere in the image window. The mouse button states associated with it are:

To print text, place cursor at the desired location and click left button. Now you can type the text string that is to be printed. To indicate the end of the string, type the Return key. The string now gets displayed. The nature of the font for the text is determined by the state of the switch FONT. You may continue drawing text via the left mouse button and the keyboard. To terminate this option, click the right mouse button.
FONT: This is a switch with a certain number of states, each corresponding to a particular size and style of font. Experiment with the various fonts and choose the style that you like. The default state is FIXED, which corresponds to a font in which all characters are of the same width. This width and the number of states depend on the X server on the machine that runs 3DVIEWNIX.
LINE: This is a button whose purpose is to draw lines at any desired location in the image window. The mouse button states associated with it are illustrated in Figure 7.4. The thickness and the form of the line (plain or arrow) depends on the state of the switches THICK and TYPE.
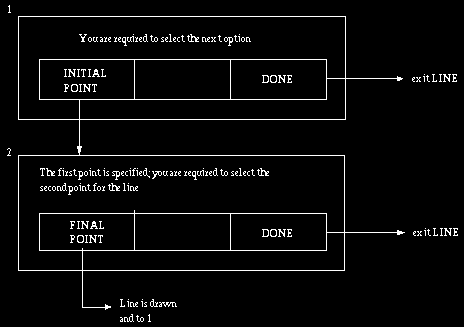
Fig 7.4: State Diagram for LINE. An arrow leaving a button area indicates
that that button is clicked.
BOX: This is a button which allows drawing rectangular boxes of form (solid or round corners) and thickness determined by the switches MODE, STYLE and THICK. Its state diagram is identical to that of LINE shown in Figure 7.4 whose INITIAL POINT and FINAL POINT are the upper-left and lower-right corners of the rectangle, respectively.
MODE: This is a switch with two states SOLID and DASH. The states indicate the form of the line graphics drawn using the options LINE and BOX. The default state is SOLID.
THICK: This is a switch with 9 states, each of which indicates the thickness of the line graphics drawn using the options LINE and BOX. The default thickness is 1.
STYLE: This is a switch with two states called BUTT and ROUND. In the BUTT state the line graphics drawn via LINE and BOX have sharp corners. In the ROUND state, the corners are rounded. The default state is BUTT.
GRID: This is a switch with 8 states. The default state is 1. The states indicate the spacing of a quadrille grid system used for drawing the line graphics.
ERASE: This is a button whose purpose is to allow erasure of text and graphics drawn in a rectangular region. The rectangle is chosen as in the BOX option. Note that all entities within the rectangle, including any image information, are erased.
OUTPUT, SAVE:
The purpose of these static options is to enable the user to specify a desired name for the output files in those operations that actually produce an output and to initiate the output operation. OUTPUT is a switch and SAVE is a button. Interposed between them is a tablet as shown in Figure 7.5. The number of states associated with the switch is the number of output files to be created for the command under consideration. Consider, for example, the threshold command under PREPROCESS-Segment. Given a scene, it allows selecting multiple threshold intervals and creating a separate binary scene for each interval in a separate file.

Fig 7.5: Layout of OUTPUT, SAVE Options in Mouse Window.
Suppose we use three threshold intervals. Then the switch values of OUTPUT will be INT1, INT2, INT3. Associated with each switch value there is a file name. The default names for the threshold command are thrsld-tmp1, thrsld-tmp2, thrsld-tmp3. These names can be changed by the user. To do so, first set OUTPUT to the desired switch value. Then place the cursor in the file name field and press the left button. Now the keyboard can be used to change the default name. When a name is set as desired, the output operation can be initiated for that file by pressing the SAVE button.
SVSCRN, SAVE:
This combination of options works exactly like the OUTPUT and SAVE options above. SVSCRN (an abbreviation for Save Screen) is a switch and SAVE is a button and their layout is as illustrated in Figure 7.6.

Fig 7.6: Layout of SVSCRN, SAVE Options.
The purpose of these options is to make it possible, at any time during a 3DVIEWNIX session, to save the current screen composition as a picture in a file. SVSCRN has two states APND (default state) and OVWR. In the APND state, the picture information is appended to the file whose name appears in the tablet in the middle (default name is svscrn-tmp; all files created by SVSCRN have a fixed extension SCRN). In the OVWR state, the picture information is overwritten to the file, and any previously saved picture information may be lost. The user can modify the file name by placing the cursor in the tablet, clicking the left mouse button, and subsequently using the keyboard typing the desired name. The save screen operation is executed only when the SAVE button is pressed.
These options save the complete color map information in addition to the picture information. Any number of pictures with possibly different color maps can be saved in this fashion. The saved pictures can be redisplayed using the menu command MISCELLANEOUS-ShowScreen. SVSCRN and ShowScreen together facilitate convenient archival of selected screen compositions for conferencing, demonstration, and presentation.
DIAL_WIN:
This is a switch with two states ON and OFF. The default state is ON. Its purpose is to allow the user to turn off the entire dialog window so that that area becomes available for image display. In other words, the image window can be extended to cover the whole screen except the region of the mouse window. To get the dialog window and its contents back, DIAL_WIN should be switched to the ON state.
RUN_MODE:
This is a switch with two states called FG (for Foreground) and BG (for Background), the default sate being FG. When the state is FG all operations are done in an on-line mode. In the BG state, certain computationally intensive operations are executed in an off-line mode. This frees up the machine for carrying out interactive processing operations. For illustration, PREPROCESS-Interpolate is a computationally intensive command, especially when we want the output scene resolution to be much higher than that of the input scene. Once the processing parameter values have been selected, therefore, it is a good idea to relegate the actual output operation to the background mode so that the user may continue with the interactive sessions without having to wait for the output operation to complete. To accomplish this, the RUN_MODE switch should be set to BG prior to initiating the SAVE option in OUTPUT. When the background process is completed, a message is flashed to the user in the title window to this effect.
 User Manual
 Library Ref. Manual
 Tutorial