Tutorial 1: How to import data into 3dviewnix
The simplest way to import data into 3dviewnix is by using the EasyHeader
module. This can be accessed via PORT-DATA->In->EasyHeader.
EasyHeader would allow you to generate a 3dviewnix gray data file
interactively.
EasyHeader assumes that your data is of the following form:
- Data is in a rectangular array.
- You know the file this is stored in and you know the byte
offset to the beginning of the data segment. (length of the header)
- Data is 8 or 16 bits. (If it is 16 bits that it has the same
- Inter slice spacing is the same through the data set.
- Your data is 3 or 4 dimensional.
byte ordering as the machine you are running on.)
- That you know the :
- Width and height of the rectangular array.
- Number of slices in the file.
- The size of the pixel in mm.
- The slice spacing. (the spacing between two adjoining slices.
- If you need to do work with multiple scan sequences the
staring z location relative to the scanner.
- If 4 dimensional the initial time stamp and time gaps
between subsequent volumes.
PART I:
You will see the following fields that you have to set
in the image window. (To fill in a field press the left button
on the field and then type in what you want).
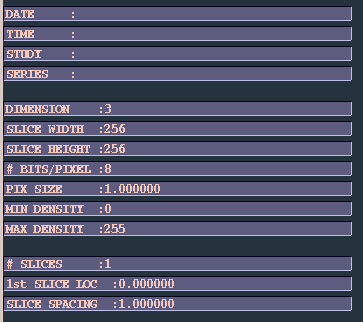
Of these DATA, TIME, STUDY and SERIES are optional.
DIMENSION has to be 3 or 4.
# BITS/PIXEL should be 8 or 16.
If you know the minimum and the maximum intensity value
specify that for MIN DENSITY, MAX DENSITY. If you don't
know specify 0 for MIN DENSITY and a good upper limit
(255 for 8 bit and 4095 for 16 bit normally works
fine for medical data) . If your upper limit is much
bigger than the actual values in the image when
you display the slices in any module it will appear
very dark, but you can change the gray map to make the
image appear lighter.
The PIXEL SIZE and SLICE SPACING should be set correctly.
The 3d visualization would appear incorrect if you do not
set these values correctly. (If you don't know these values,
you need to at least know a correct ratio between them).
Number of SLICES should be filled in correctly.
1st SLICE LOC as described in (6). will have to be filled
as needed. If you don't need this use 0.0 for this.
PART II:
Now you are ready to save the 3dviewnix header.
You should see the following fields in the dialog
window.
Give a suitable file name for the 3dviewnix file
you are creating. This file should have the .IM0
extension at the end of the file name. (it is
a zero and not a 'O' at the end of .IM0)

In the dialog window you will see a button called
SAVE NEWHDR. Press this to write out the header.
You will see an error message when you do this.
You can ignore this message if it an error 106 or
error 107.
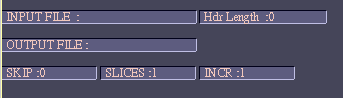
PART III:
Now you are ready to append the actual data to the end
of the 3DVIEWNIX header. Now you should know the name of the
file containing the data and how big the header in
that file is (how many bytes to skip to locate the start
of the data segment).
First fill out the field INPUTFILE with the name of the
file. Next fill in the Hdr Length with the size of the
input file header (if it is raw data this is zero).
Now change the field SLICES in the dialog window to the same
value that is given in # SLICES in the image window.
Now press SAVEDATA. This should write out the data segment
to the end of the 3dviewnix file.
 User Manual
 Library Ref. Manual
 Tutorial